Fun with coreopsis

coreopsis05

Last time I tried to grow these, I got a few spindly stalks with hardly anything on them. Which means, this year I totally underestimated how far apart I should plant and now I have a waist high jungle of thick, thick plants with hardly a size 5 footprint anywhere for me to reach the middle for picking flowers. I’ve taken to wearing my Fivefingers, to make the footprint smaller than a pair of Crocs (I apologize to those of you who are fashion conscious, but they DO work well for zipping in and out of the house all day).

I know they work really well frozen, so this year I’ll try drying some and see if that works, because it’s easier to store anywhere. Whereas steak and peas don’t survive for very long on a wardrobe shelf…

coreopsis03

And I’ll have enough to conduct a series of tests, as I’ve heard a rumour they are pH sensitive. If you just want a regular yellow, you need less than half your yarnweight in flowers, or you can start with plenty and dye one skein at a time from orange over turmeric to sunny yellow until it exhausts. It also doesn’t need a lot of heat once the dye is extracted from the flowers, it’s excellent for solar dyeing and on silk.

coreopsis09coreopsis08

So the plan would be:

  1. alkaline for reds
  2. acid for yellows
  3. test skeins in neutral
  4. amounts – work my way from strong dyebath to an exhausted one
  5. if the reds come out – test them with tin, to see if it gets even redder
  6. iron and copper possibly

coreopsis04

You can get a lot of different yellows from the exhaust, depending on amount of yarn, plants, temperature, how long you let each skein remain in the bath etc. Here’s the 2011 batch with some cold dyed Japanese Indigo:

Japanese Indigo

Skønhedsøje

Coreopsis tinctoria er rigtig god at lege med fordi man kan få så mange forskellige nuancer. Hvis man starter med et kraftigt farvebad og kommer 1 fed i af gangen, kan man få fra kraftig orange over gurkemeje-gylden til frisk solgul.

I år ville jeg så også lige teste påstande om at den er pH følsom, rød fra basisk farvebad og gul fra surt. Det blev en helt anden slags gul end ellers, og pga en fejl fra min side (manglende base) lavede jeg også lige en variant med kobber.

Der skal meget lidt blomst til, til alm gul behøver man mindre end halvdelen af garnvægten. Også flot på silke og god at solfarve med.

Det fungerer også rigtig godt at fryse blomsterne, men i år vil jeg også forsøge at tørre, da det er lidt nemmere at opbevare. Bøf og ærter holder knap så godt i et garderobeskab. 😉

coreopsis02

Tagetes 3

tagetes9

Having used double up plant to yarn the first time, I wanted to test the dye properties at 1:1 ratio. I used the tagetes tenuifolia.

I did 1 alum, 1 rhubarb and then 1 copper mordanted in a pot of its own. And yes, it’s different, but not green like the first year, I must have really overdone it back then. Now I’m intrigued as to actually getting green on purpose.

Rhubarb: you disappoint me (again). It may be that it only works in some plant combinations, but frankly then I can’t be bothered. I also have no succes with it on cotton, but more on that later.

tagetes7

These three skeins didn’t even get simmered, I just put them in the warm dyebath to soak. So I decided to test how far I could go on the exhaust, one skein at a time. 5 more skeins, so that’s 200 g yarn from 75 g of flowers.

tagetes8

Tagetes 1

Tagetes 2

Tagetes igen igendanish

Sidst brugte jeg dobbelt op af plante i forhold til garn, så jeg ville lige teste en gang 1:1. Samt det rabarberbejdsede garn og kobber i en gryde for sig.

Denne gang fik jeg ikke grøn fra kobber som det første år, så nu tænker jeg jo på, hvordan man får det med vilje. Rabarber er igen meget skuffende/kedeligt, jeg tror ikke det er noget jeg vil bruge krudt på igen.

Efter 3 fed farvet 1:1 ville jeg så teste hvor meget ekstra farve der var i, så jeg blev ved med at putte garn i, et fed af gangen indtil det blev meget lyst. 5 stk. blev det til, så det er i alt 200 g garn til 75 g blomster! Jeg brugte Appelsintagetes denne gang.

Hedge dyeing

Ribes alpinum
ribes

ribes6

I’d promised somebody, I think it was Mary Jo, to do a dyepot of my hedge clippings. So now I have, truly the clippings, bits of twigs and all, as I’m in no mood or timeframe to pick off the leaves.

Worst case I’d get some boring yellow that can go into the green bin, right? (my green bin being skeins destined for indigo or woad).

ribes3

I was quite surprised to get up in the morning and find a red dyebath. So I did two skeins instead of one, as part of my “no mordant project”.

Now of course I wonder how a pH change works with this… But first, testing permanence, the hedge will grow back next year. I’m contemplating trying to dry some of it though.

ribes8

So, this is me a week later and I finally cut the last stretch of hedge. I’m really late this year, but so is everything else, right? 😉 And you know, all work and no play…

So I decided I would rib some leaves from my cuttings and throw in a skein. Amount: until I got hot and bored. Yarn: 25 g as usual. I do love my preskeined “tapestry yarn” for this.

ribes5

ribes7
First skein, then another in the exhaust

Ribes Alpinum

Jeg blev bedt om at farve noget med mit hækafklip, og tænkte at det jo ikke kan gå værre end at det bliver kedeligt gul. Det kan sikkert bliver meget smukt med indigo ovenpå.

Så jeg blev lidt overrasket, da farvebadet var rødt! Og garnet orange. Så nu spekulerer jeg på, hvad pH ændringer kunne gøre. Men heldigvis vokser hækken jo ud igen til næste år, nu vil jeg lige teste farvens holdbarhed først.

Første billede er bejdset og ubejdset på hele kviste med blade og farven trukket ud med lidt base, det næste er bejdset på kun blade og rent vand, nederste er første sæt i fuld sol.

ribes4
first set full sun


St. John’s Wort – Perikon

perikum3

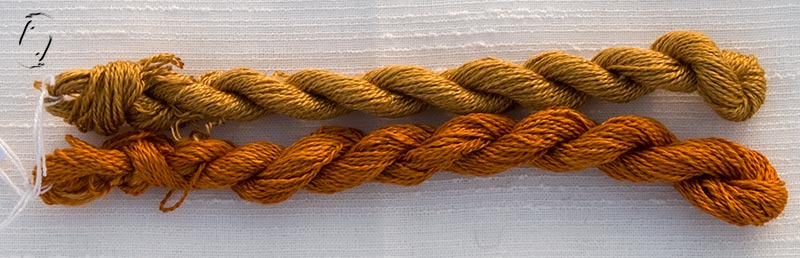
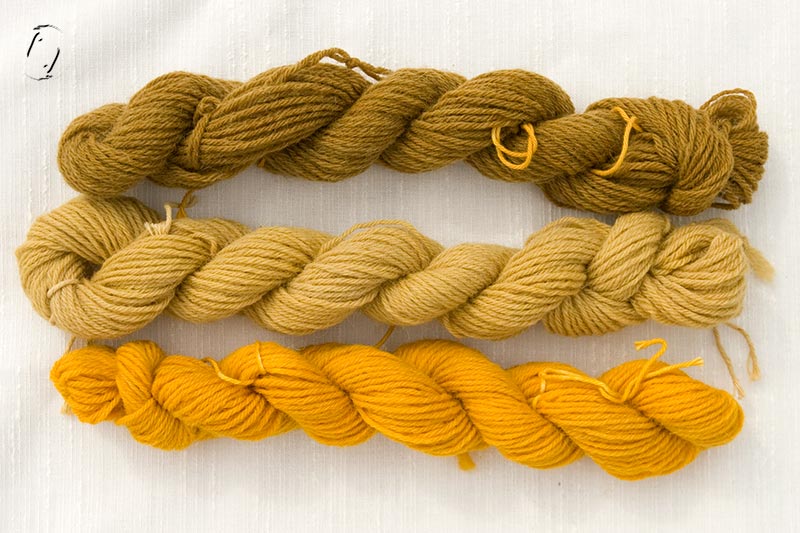
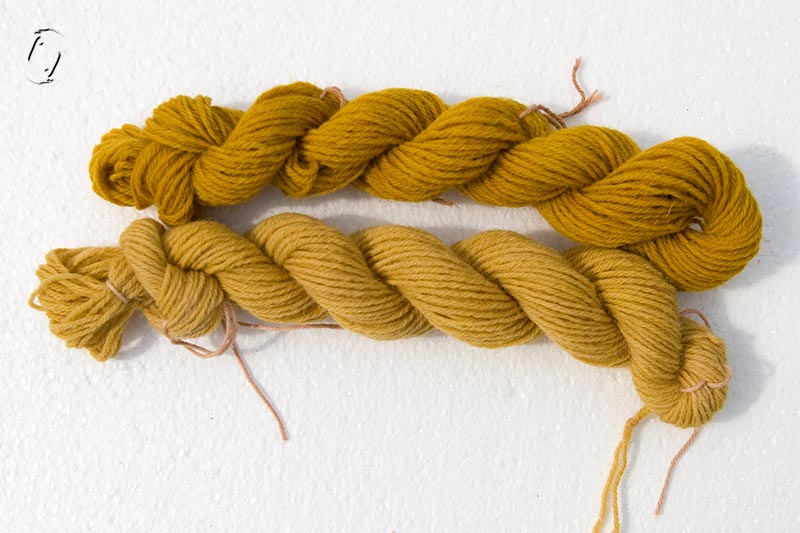
I’ve been dyeing several sets first with flowers only and one set with whole plants. A “set” refers to the method where you dip one skein for 5-20 minutes, take it out, enter another for an hour, then a third until it cools and finally reheat with a fourth. This supposedly gives you green, red, brown and yellow.

For me, the green is certain, no matter the contents and the dye temperature, the 2nd unmordanted skein is also a sure beige no matter what I do! No red whatsoever apart from a pinkish orange skein of silk in a dyebath of its own.

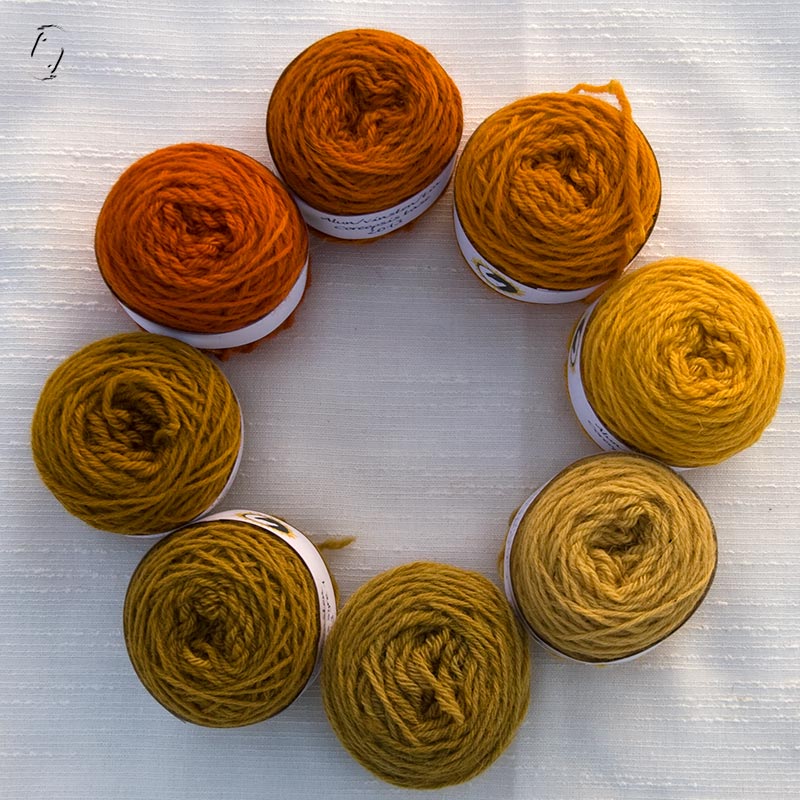
For thirds I got both yellow and green, the last skeins were a beigey orange.

I used “equal dyestuffs” in the sense that if I had 4 x 25 g of wool I used at least 100 g of flowers. When I get to the last bath, the solution is very weak.

At first I thought I missed the point where you “take out the 2nd skein when it’s red” because I went outside to pick black currants. Way too many things happening at once, I had 4 different dyepots going that day and really needed to get out of the house rather than watch them – and well, the book did say 1 hour! But after trying new batches, watching them like a hawk, all I can say is, my plants with my water = beige on unmordanted wool. No matter if you pop it in first, even.

But I still got several different shades from one dyebath, and I plan to overdye the lookalikes. Woad?
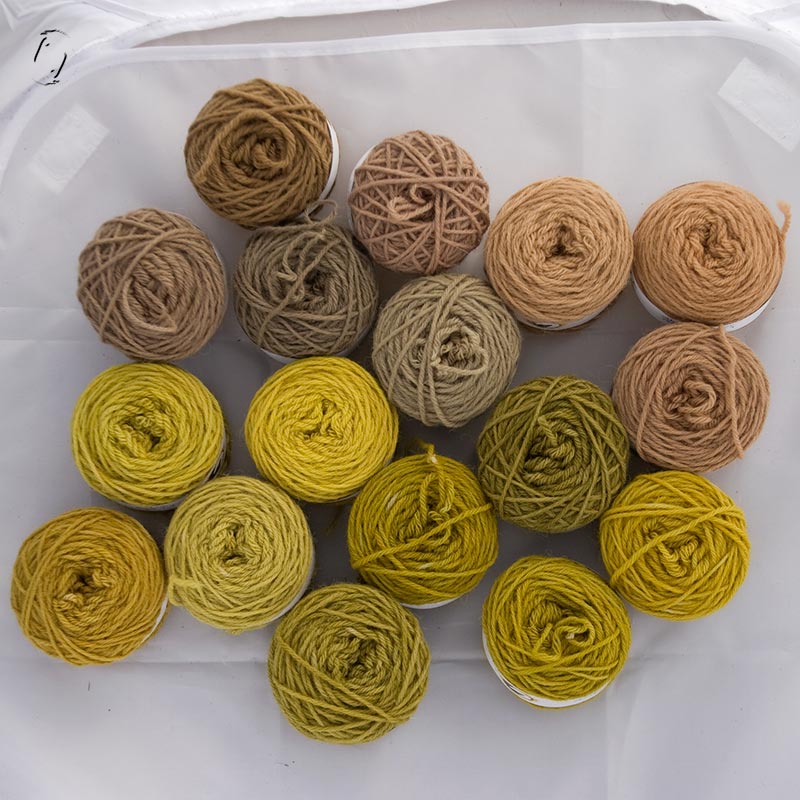
Firsts:
perikum01

Seconds:
perikum02

Thirds:
perikum03

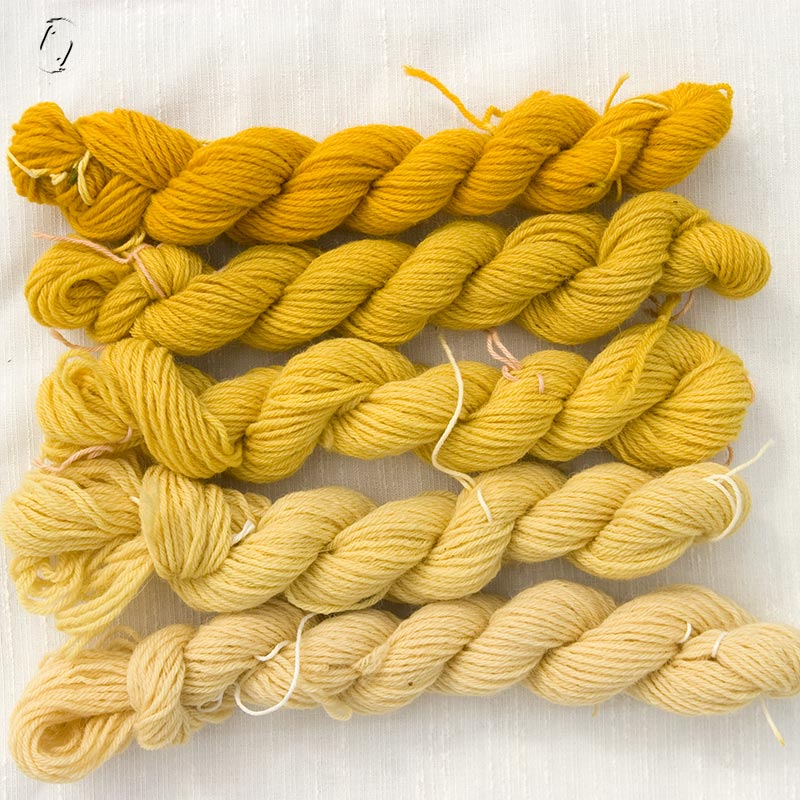
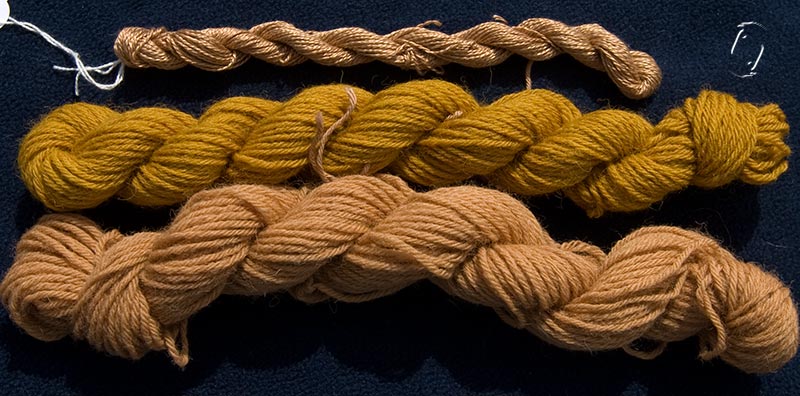
I added silk to see if they behave the same way as wool. That would give me – or you – the option of dyeing small amounts of yarn if you can only find a few flowers, each skein is only about 3 g. I forgot to put in a 3rd silk skein, so didn’t bother with a 4th, but when I repeated the experiment, I skipped the first 2 and then popped one in the 3rd. The wool results weren’t the same on each set, but in any case it doesn’t look like the silk will take any green or yellow from this plant. The one on the bottom is the one I did alone, it’s more orange than shows, but silk is very hard to photograph. It’s either extremely shiny or not at all.

perikumsilk2


.
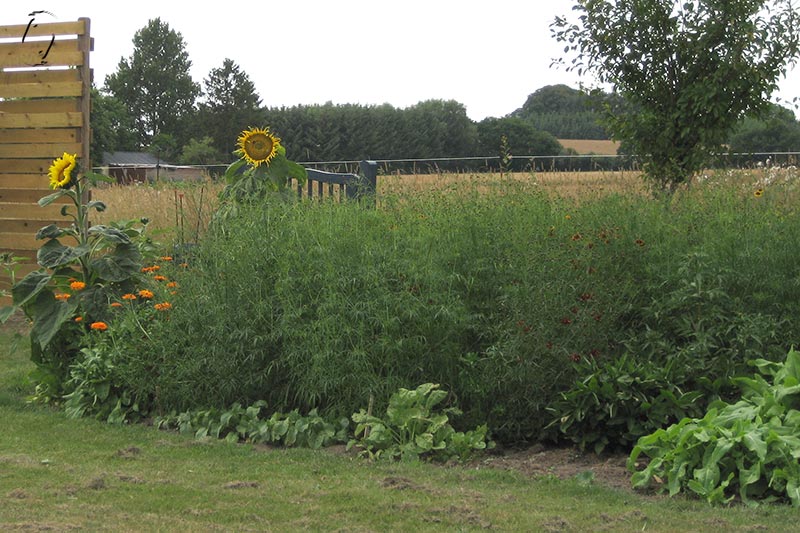
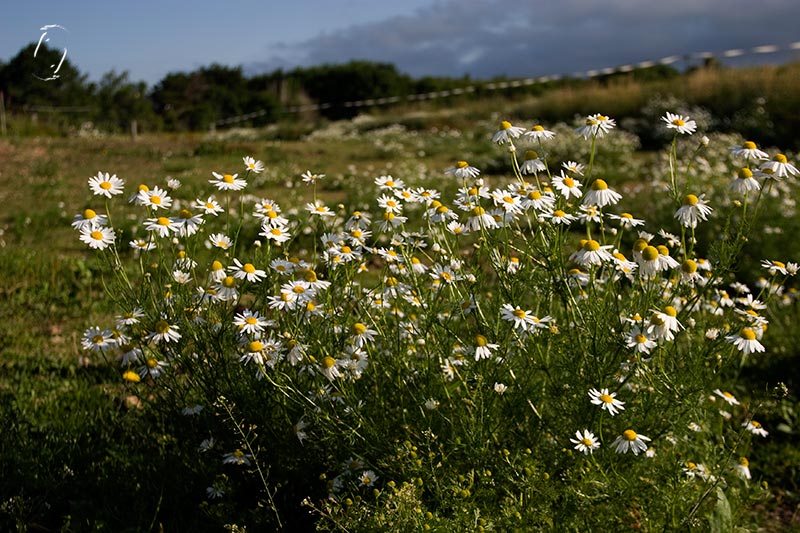
I have so many plants now that I could do several experiments. One of the advantages of letting farmland grow wild, all these interesting plants appear just like that. Our neighbours think I’m nuts, especially because I won’t let them “help me” use my land to make profit (for themselves). But I’m really fed up with everywhere being so trimmed, polished and streamlined, every bit of land either filled with monocultures or asphalt. The deer LOVE my tall grass pasture. They have babies in it.

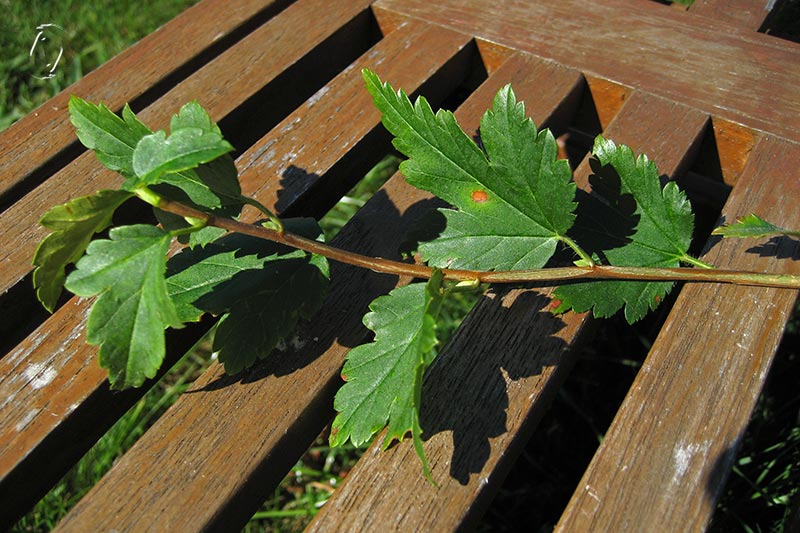
Since you can dye with the whole plant as well – some do the same sequence that I described above, or you can just do the usual mordant then dye procedure, I had to try that too, obviously. I read here and there that people dry the plant and use later, the books mentioned above say that this won’t work with the flowers. I’ve only tried saving the flowers in alcohol.

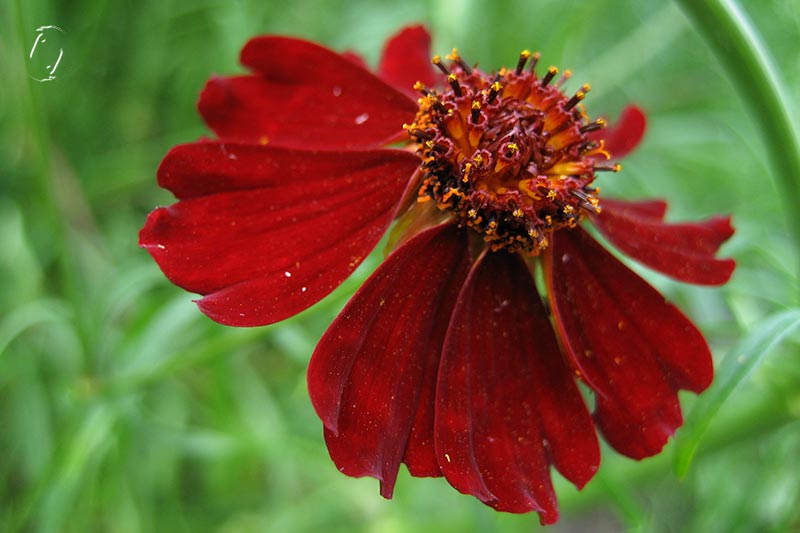
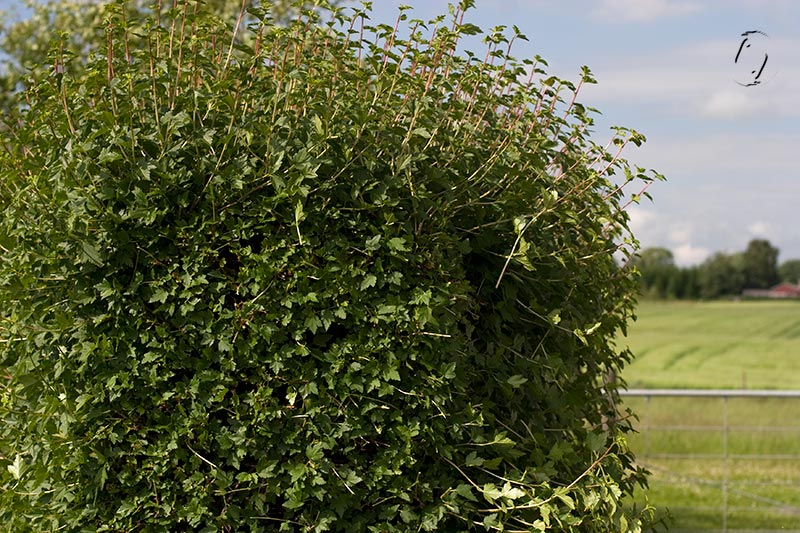
So I cut some reasonably youngish and fresh plants and tried to simmer them to get the same wonderful red. Close to 200 g, much easier to get enough obviously.

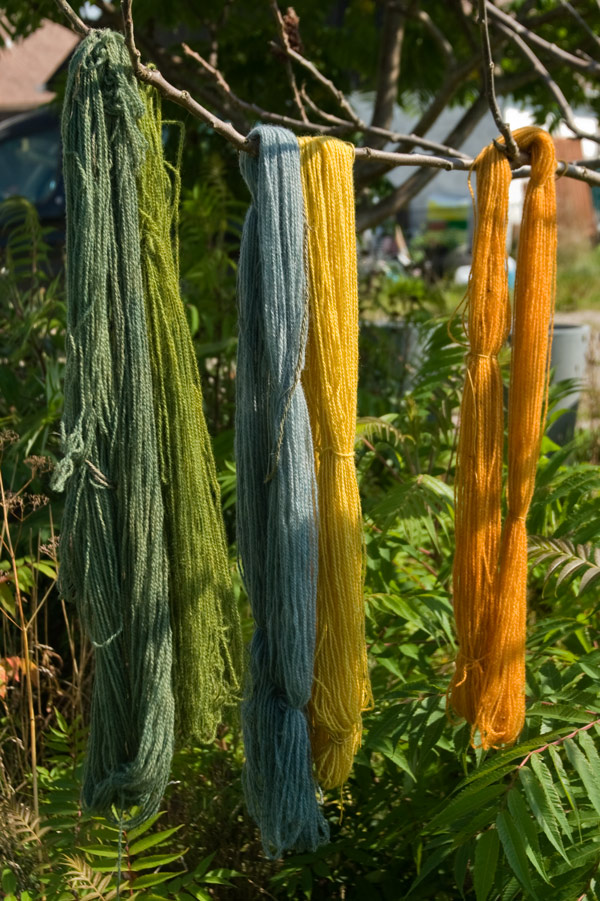
The first skein turned a brilliant yellow in the first few minutes, and while I was deciding that I wanted to keep that and to see what came next, it was already turning greenish. Took it out and broke the sequence, I added not only the unmordanted-destined-for-beige, I included a mordanted skein too, since the dyestuff ratio was so much higher, and, well – still beige, and another green. It’s a LOVELY green, and with a bit of modification I see lots of possibilities

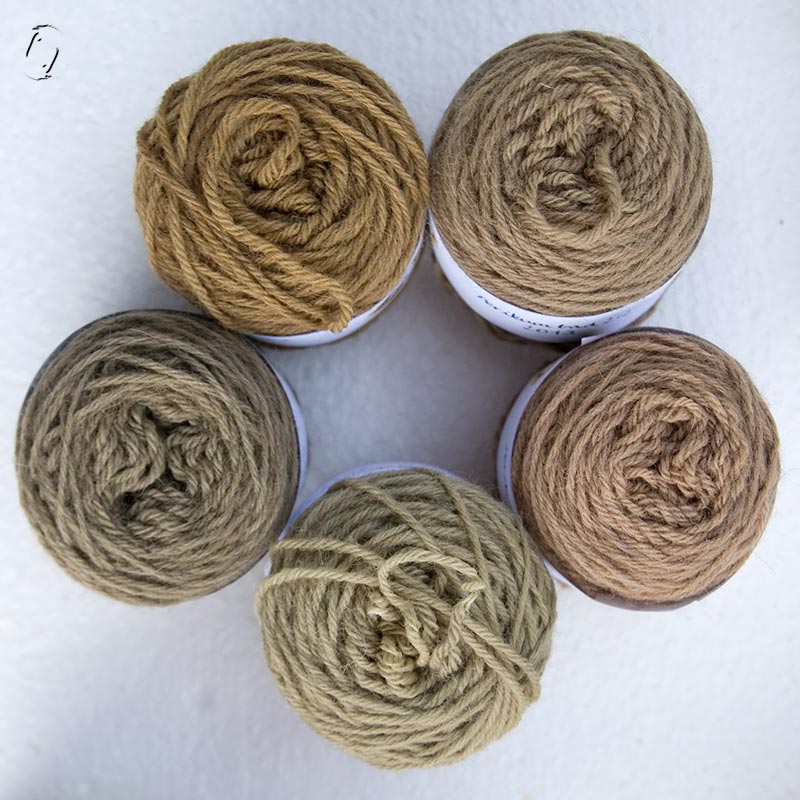
Since the 2nd skeins are all so dull, I’m wondering if I can use the same skein for that over and over, or, simply use this plant for green and skip the other stages.

I also feel extremely clever (not), because it turned out that I’d used the tin mordanted skeins (which I normally reserve for madder) in the last 2 experiments.  Doh. Not that it made any difference probably, but still, not exactly correct procedure.

I think next year I’ll just pop new skeins in every 5-10 minutes, all mordanted, and see how far it goes. One thing you could also do is put one in and get it out as soon as it’s yellow, a few minutes only, then another for green. Or together, and leave one in longer.

This is one of the things that facinates me about plant dyeing. Some respond to changes in pH or temperature, others don’t care if you boil them, soak them – they just give the same every time. Some will change in minutes being dunked in a pot of rusty water, others have to be heated with the iron to change and again, some don’t change at all. So if your usual method doesn’t work for a new plant – try changing your method before you “give up” or conclude anything.

So I decided on one last experiment. Getting my third “last skein” in a weak salmonpeach colour, I left it in the dyepot and added MORE plants, which I then reheated, then took off the stove and left there to cool. So what would YOU expect to get? Green? Brown? Mucky fawn? Indeed, what I got was: nothing. It looked exactly the same as before I added the new plants. Which in itself is interesting, except that I now have 3 skeins of absolutely no value except perhaps if I want to crochet a doll with a sickly face colour.

Fourths:perikum04

Image a bit dark – look below for proper colour
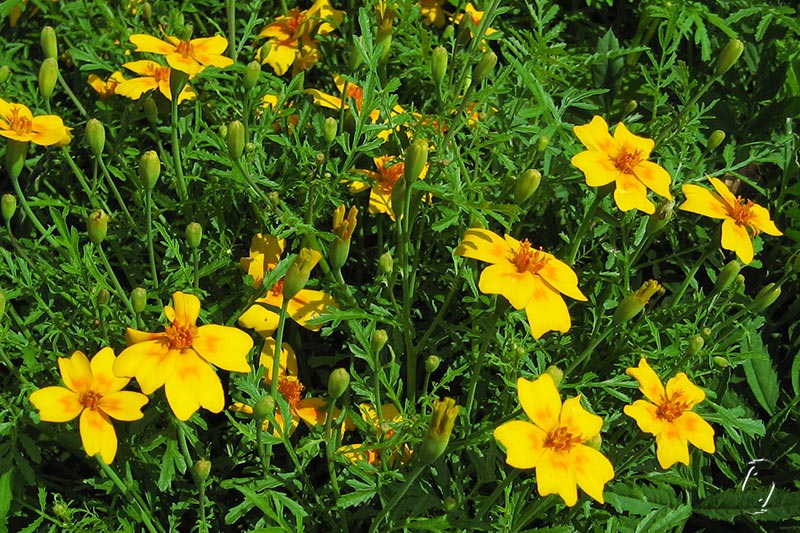
Perikonblomsterdanish

Jeg har så mange perikonplanter på engen efterhånden, at der er rigeligt blomster til at få testet den specielle metode med at farve i sekvenser. Teoretisk set skal man kunne få både grøn og rød fra samme gryde, men den røde er godt nok en anelse genert. På uld får jeg grøn, brun, gul og orange, på silke sådan en slags rosa-beige i forskellige nuancer.

Jeg gjorde fem forsøg med 25 g uldbundter og 3 g silke i hver sekvens. Ca. 100 g plante i hvert forsøg, eller 50 i det tredje hvor jeg kun farvede 2 fed. Det femte sæt var med hele planter, de fire første kun med blomster.

Det pudsige er, at når man laver snaps, er farven jo rød, men når man koger blomsterne alene, bliver badet mere brunligt. Så jeg blev ret overrasket, da et prøvebad med en hel plante blev flot rubinrød! Så jeg måtte lige teste et blomsterbad mere uden kogning, det blev sådan nærmere rødvinsfarvet.

En sekvens har 4 stadier. Når man har simret blomsterne en times tid og siet dem, kommer man 1 fed i gryden 5-20 minutter, det bliver grønt. Næste skal i en time og skulle blive rødt men mine bliver beige eller brune. Tredje fed skal ligge koldt natten over, det første blev gult, anden runde blev lysegrønt. Nr. 4 og 4 blev hhv orange og beige.

Silken i første test blev variende grader af – beige. Jeg lavede så et fed silke for sig selv med en hel plante (den flotte blodrøde gryde), og det blev fint rosa-orange (mere rosa før tørring).

I tredje forsøg lavede jeg kun 2 fed med halvt så mange blomster. Og byttede rundt på rækkefølgen, jeg kom et ubejset fed i først, derefter et bejdset. Den almindelige sekvens hedder bejdset-ubejdset-bejdset-bejdset. Det første fed i runde tre blev som sædvanlig beige, men fik en tur i det rosa silkebad og tog farve af det. Fed nr. 2, det bejdsede, startede med grøn, men jeg lod det ligge i gryden lidt og så blev det nærmest bronzegyldent.

De fire blev altså ikke helt ens, pånær den grønne som er ret pålidelig. Jeg synes selv det første sæt blev det bedste, men det var spændende hver gang.

Når man farver med hele planten, så får man jo lidt mere materiale at arbejde med. Enten farve almindeligt med et enkelt farvebad, eller forsøge hele sekvensen som ovenfor.

Jeg har læst mig til at nogen tørrer planten og med held farver med den senere. Jeg har kun forsøgt med en lille mængde blomster i alkohol, ligesom når man laver snaps.

Fremover dropper jeg det ubejdsede fed og vil prøve at simpelthen hive op og putte nye i hver gang de har taget farve og se hvor langt jeg kan strække den. Det er en af de ting som er så spændende med plantefarvning, man kan ikke bruge samme metode til alle planter. Nogen giver bare det samme hver gang, uanset om det er koldt eller varmt vand, sur eller basisk pH, andre kan ændres på flere måder. Nogen kan nøjes med et kort dyp i en spand med hesteskovand, andre skal opvarmes med jernopløsning for at give farveskift.

perikum05

False chamomile – Lugtløs kamille

Scentless chamomile, wild chamomile, mayweed, Matricaria perforata.

kamille02

If you don’t have the time or space to grow specific dye plants, there is plenty to be found in the wild. I wanted to do a comparison of chamomiles and decided to use the method of extraction described by Leena in Finland. She suggests that you can get more dyestuff out of the plant by making the water alkaline. When the dye has cooled it returns magically to a neutral pH, you can then add the wool without harming it. I did one pot with just regular boiling of plants, the other with 1 tbsp. of potash. One alum skein and one unmordanted in each pot. As you can see, the yarn from the alkaline extraction is a lot darker! If your bath is not quite neutral enough after cooling, you can add a small slosh of vinegar, the extra dye will still be in there.

scentless

I think this yellow is just as good as Dyer’s Chamomile, remains to be seen if there’s a difference in permanence. Of course you won’t get the orange that the Anthemis tinctoria provides just with enough dyestuff, but the alkaline method works to get a fair orange (not as vibrant) and for yellow it’s a good and cheap source, available all summer in your nearest ditch. I used the whole plant, so no careful picking of flower heads either.

You will need to use the fresh plants, though, no freezing or drying. I also used a huge dye ratio, like 15:1, so that is another difference. Not that it matters, it’s so abundant where it is. The dye ratio however doesn’t really show in the unmordanted skeins, so perhaps they would come out with no colour at all at a lower rate. Mordanted yarn should give a less golden, clearer yellow at a lower ratio and with iron I’m assuming you could get some sort of olive colour.

Tomorrow we’ll try a different chamomile!

på danskdanish

Lugtløs kamille er ideel at farve med, hvis man ikke har farveplanter i sin have, eller slet ingen have. Den breder sig lystigt på kornmarker hvis den får lov og helt sikkert alle andre steder som ikke sprøjtes.

Jeg besluttede mig for at teste en metode til at trække mere gul ud af planten ved at gøre vandet basisk med potaske, ca. en spsk. til en stor 8 l. gryde. Når vandet så har kogt og er kølet ned igen, falder pH værdien igen til neutral – hvis ikke kan man tilsætte en lille sjat eddike – den ekstra farve er stadig i vandet.

Jeg lavede en identisk gryde uden base, og som det ses på billedet er den en del lysere. Den orange farve er ikke helt ligeså klar som med farve-gåseurt, jeg har også brugt en hel del mere plante (15:1), men det er da et fint alternativ. De to fed i midten er ikke blevet bejset først. Med tanke på den enorme mængde planter jeg brugte, så tænker jeg, at det ikke kan betale sig at farve ubejdset garn, men med alun kan man godt nøjes med mindre mængder og stadig få en flot gul. Med jern vil jeg tro man kan få olivengrøn eller noget i den henretning.

Man kan ikke tørre eller fryse vild kamille og farve senere, som man kan med gåseurt, det skal bruges frisk.

I morgen prøver vi med en anden slags kamille!